Studio Setup | Studio Gear | Microphones | Mic Techniques | Mixers | Mixing
Multitracks | Common Effects | EQ Techniques | PC | Terminology
![]()
Studio Set Up
Recording studios generally consist of two basic sections: the studio itself, where the sound for the recording is created which may consist of several different rooms, and the the control room, where sound coming from the studio is recorded and manipulated. This section on music studio setup assumes that you are interested in setting up a home studio for personal use, logically if you were setting up a professional studio you would hire professionals to do the design layout and construction, and would probably not be reading this. So proceeding from that premise there are two main aspects of setting up a recording studio which will pretty much determine what steps you must take, and the final outcome of your finished music studio. The first consideration is the type of music you wish to record, this will have a large bearing on the size of your studio, recording a solo performance obviously requires much less space than recording a whole band. The second consideration is, of course, your budget, how much can you spend vs. how much you are willing to spend will have bearing on the quality of your finished production.
The first step is to decide where your master control booth will be located, this will house your recording, mixing, effects and monitor equipment. Set your console where it will stay, and plan carefully since you don't want to move it over and over again. Make certain that you have more than enough inputs to cover any possible scenario that may arise. With the affordability of multitrack/mixers that have a large number of inputs, insuring that everyone has their own individual "line in" is not difficult, even allowing multi-inputs for percussion. Another tool giving us a wide range of control over what goes into the final result is the software currently available, which can turn any decent PC into a studio at a reasonable price, and expand your ability to manipulate the signals.
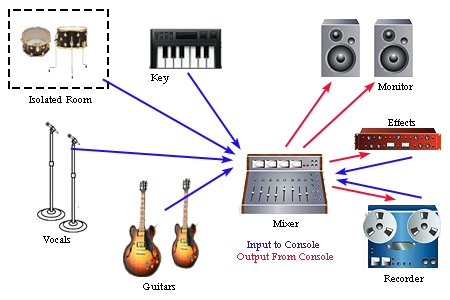
Next set up your outputs from the console. Connect your monitors, recording unit, your computer, (if you plan on using one), and any effects units you may wish to use. Now, This Is Important, each out-putted device should in turn have it's own output terminals reconnected back to an input on the console. Mixers and Multitrack units usually have designated in/out loops specifically for hooking up your effects units and recording decks.The reason for this is that you want to be able to monitor the signal wet or dry. A dry signal is the pure sound that you are receiving at the console without effects added, a wet sound is what you hear after adding your effects. The ability to monitor wet or dry signals lets you determine more accurately what your finished product will sound like. You will know what you have, not what you think you have, and knowing what is coming in will allow you to mix and manipulate the song more effectively without the effects interfering with good judgment.
The diagram below is a very simplistic example of signal path to and from console.

Acoustics are a big issue and invariably difficult to deal with in limited space. Your typical bare walls and square corners in the average home will wreak havoc on your attempts to get a good sound. Outside noises, traffic, kids playing, etc, will also invariably find their way onto your finished recording if not dealt with using some means of soundproofing.
Ideally the perfect medium for soundproofing is "Acoustical Foam" which can be purchased at a large number of on-line retailers. The cost can vary greatly from one distributer to another, and the type, or style of foam you decide to use. These panels come in assorted sizes and you can figure to spend around 12 to 14 hundred dollars on a 8 foot by 10 foot room. These panels can be attached to the walls for a permanent studio or made into "movable walls" for temporary studios.
While carpetting is not the ideal material, it will do in a pinch if your budget does not include acoustical foam. Inexpensively you can deal with reflected or echoed sounds, and standing waves to some extent by hanging carpet on the walls or using foldout dressing screens to break up the square shape of a room. Movable wall panels or foldouts can be made using carpet padding, (the textured, diamond pattern grade), allowing you to re-configure the studio layout as needed. Isolation can be achieved simply by separating instruments, (especially percussion), into individually soundproofed rooms throughout the house, which will the require a means of individual monitoring through headsets for each musician.
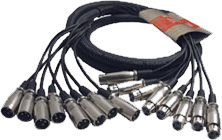
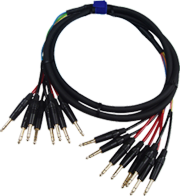
Running cables throughout the studio can be as simple as buying pre-bundled "Snakes", which consist of cables that are wrapped together and can be found in various lengths and cable counts. These will also make it easy to set up, tear down, or reconfigure as the need arises. The snakes have each individual cable coded for easy identification and hookup, and you can also color code each separate snake to designate what section of the studio it runs to/from. A major point of consideration is where are those cable going to be run? Make sure you are not creating trip points, nice neat cable runs are not just safe, they are efficient and make for an easy job when you need to rearrange or pack up your studio. Try to limit any sections of loose cable, by wrapping excess around the mic stand, or coiling it up behind other pieces of equipment, so they are not in the "work-way". The only exception is at either end of your connections, be it at the amp/console, or at the mic/instrument, having a small coil, (2-3wraps), on the floor in these areas will prevent damage to equipment, or cables if someone does trip on a cable, this gives you a little buffer zone before the cable rips out of the connector.


Ideally every input going into your control console should be isolated, that is one and only one signal, whether instrument or vocal, is coming in on each individual line. One way this can be achieved is by using a DI Box. A DI box is an electronic device designed for connecting a piece of equipment with an electronic audio output to a standard line level input. It performs both level and impedance matching to minimize both noise and distortion. Another way is to place a mic in front of the individual instrument amps which will allow you to record the more characteristic sounds of a particular guitar, amp combo, for example; a Fender Strat through a vintage tube amp. The important thing is to limit the cross-talk between inputs, meaning you don't want the guitar "line in" picking up excessive drum and vocal sound which will be hard to deal with when working on your final mixdown.
Record everything with your tone controls set "flat" or at the midrange of the control knob. This will give you maximum adjustability when you do your final mixdown, and you won't be fighting to adjust for too much bass or treble on a particular instrument. On most units these tone controls will be labeled as High, Mid and Low frequency. Try to limit your use of effects during initial track recordings, as these will be hard to compensate for later on, it is impossible to remove too much reverb if you recorded the track with this effect initially. During mixdown, when you are heading towards your final sound, add your effects sparingly, a lot of music can be lost if you overly use your effects. If you initially recorded your individual tracks flat with no effects then you will always be able to go back and remix , and remix, and remix until you get it just right. Listen through your headset for that fine tuning, and your monitors, to make sure you are getting what you think you are getting, and when you have it right, produce your final mixdown to tape. Remember if it still doesn't sound "just so", you can always try again from your master tracks.
Studio Setup | Studio Gear | Microphones | Mic Techniques | Mixers | Mixing
Multitracks | Common Effects | EQ Techniques | PC | Terminology
![]()
Aces and Eighths. A music resource site. Link To Us
Site Map ![]() Comments or Questions
Comments or Questions ![]() Submissions
Submissions ![]()
Privacy Policy

AcesandEighths.com - All Respective Copyrights © Apply
